Using the GoldKey Smart Card
Contents:
– Configuring a Computer to Lock on GoldKey Removal
– Requiring a Smart Card for Active Directory Login
– BitLocker Encryption
– Document Signing
– Securing Email
Configuring a Computer to Lock on GoldKey Removal
If your computer has the GoldKey software installed, open the GoldKey application, check the “Lock Windows session when GoldKey is removed” box in the Security Options tab, and click Apply.
Otherwise, if you are using Vista or Windows 7, click on the Start bar and enter “secpol.msc” into the Search Programs and Files box.
Press enter, and go to Security Options under Local Policies, and find the “Interactive Logon: Smart card removal behavior” entry, and double-click on it. This will bring up the dialog shown in the following figure.
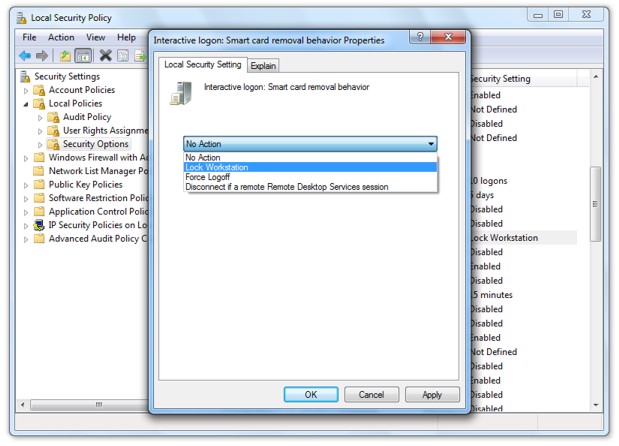 |
| Smart Card Removal Behavior |
Next, select the action that should be taken when your GoldKey is removed.
If you would like your computer locked when your GoldKey is removed, you will need to make sure the Smart Card Removal Policy service is set to start automatically. Open Control Panel, select Administrative Tools under System and Security, and open Services. Right-click on the Smart Card Removal Policy service, and select Properties. Set the service to run automatically, as shown in the following figure.
Next, click on Start, and then OK. You must log off of your account before these settings will take effect.
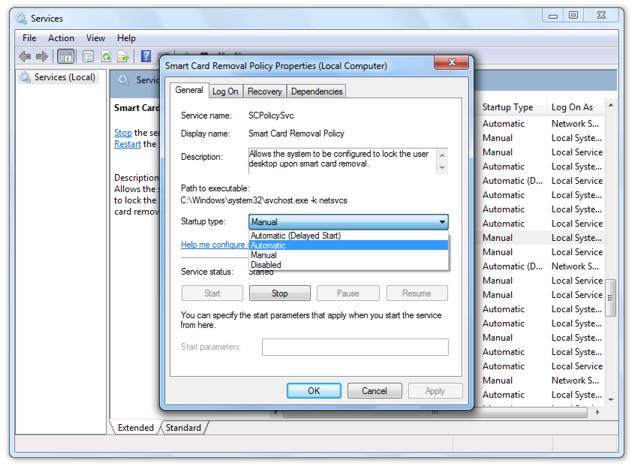 |
| Configuring the Smart Card Removal Policy Service |
Requiring a Smart Card for Active Directory Login
To require a smart card for Active Directory login, you need to change the Active Directory user settings. From the Active Directory server, go to the Users section under the appropriate domain, in Active Directory Users and Computers.
Right-click on the user who should be required to log in using a GoldKey, and click Properties. You will see the dialog shown in the following figure. Under Account Options in the Account tab, check the “Smart card is required for interactive logon” box, and click Apply.
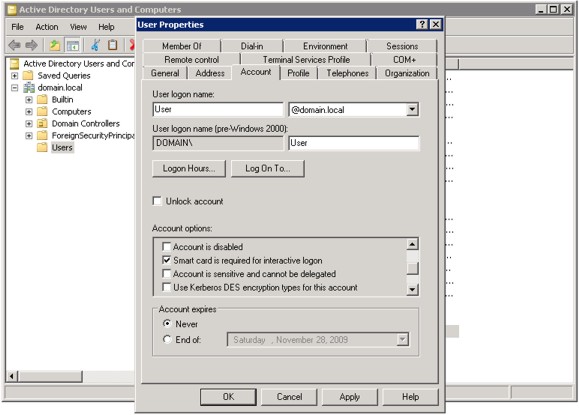 |
| Requiring a Smart Card for Login |
BitLocker Encryption
You may use the smart card built into your GoldKey to encrypt data on your computer using BitLocker. To do so, you must first obtain a certificate that may be used for BitLocker. To be used for BitLocker, a certificate must have no Key Usage attribute, or be for Key Encipherment. For more information on BitLocker certificate requirements, see the following website:
http://technet.microsoft.com/en-us/library/dd875548(WS.10).aspx
Once your certificate is on your GoldKey, open Windows Explorer and right-click on the drive you want to encrypt. Then, select Turn on BitLocker.
Insert your GoldKey into your computer, select “Use my smart card to unlock the drive,” and click Next. You will be required to save a recovery key, or to print it. Use one of the provided options, and click Next.
BitLocker will now encrypt your drive.
Top
Document Signing
To digitally sign documents, you will need a certificate having “Document Signing” in the Key Usage attribute. Once you have obtained this certificate, you will need to load it onto your token. See the Loading Certificates onto the GoldKey section for instructions.
To sign an XPS document, open it using the XPS viewer, and with your GoldKey plugged in, select Sign This Document in the Signatures menu.
If you have several certificates on your computer, you may be required to select the one most appropriate to use for signing the document. The image associated with each certificate indicates its location. The highlighted certificate shown in the following figure is on the GoldKey.
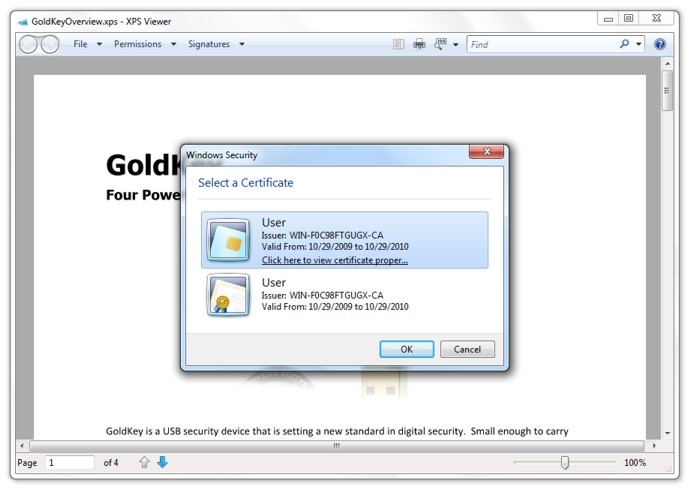 |
| Select the Certificate on your GoldKey |
After you select the certificate on your GoldKey, you will be required to enter your PIN before the document is signed.
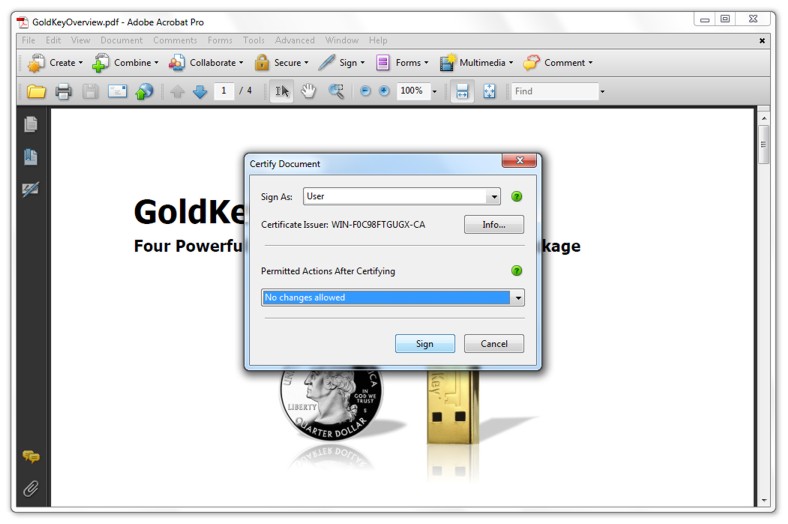
Using Adobe Acrobat Pro software, you can also digitally sign PDF documents. This requires the same type of certificate.
To sign a PDF document, open it using the Acrobat Pro software and select the type of certification you want to provide from the Sign menu. For this example we will use Certify without Visible Signature. Other methods may require you to select the area in which you would like the signature to be placed.
You will be required to select the certificate to use for signing. If you do not wish others to supply additional signatures, you must also change the Permitted Actions After Certifying to No changes allowed.
 |
| Signing a PDF Document |
Select the certificate on your GoldKey and click Sign. You will be prompted for your PIN.
Top
Securing Email
In order to use a GoldKey to digitally sign or encrypt emails, you need to obtain a certificate with “Secure Email” in the Key Usage attribute. See the Loading Certificates onto the GoldKey section for information on how to prepare the token.
Digitally Signing Email
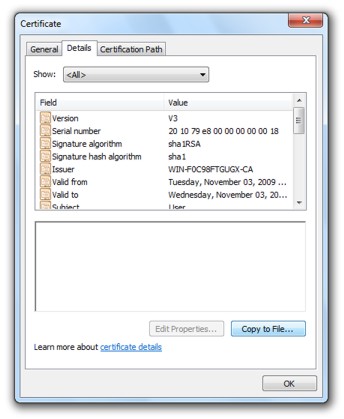
If you have the GoldKey software installed, select the certificate from the list on the GoldKey Information tab. Then click View, go to the Details tab, and click “Copy to File”. Follow the instructions in the wizard to export your public key.
 |
| Exporting a Certificate from a GoldKey |
Otherwise, click on Start, and type the following command into the search bar:
certutil -scinfo
You will be prompted for your PIN several times. After this, you will be able to select one of the certificates from your GoldKey. Select “Click here to view the certificate properties…” and click on the Copy to File button in the Details tab. Then, follow the steps in the certificate export wizard.
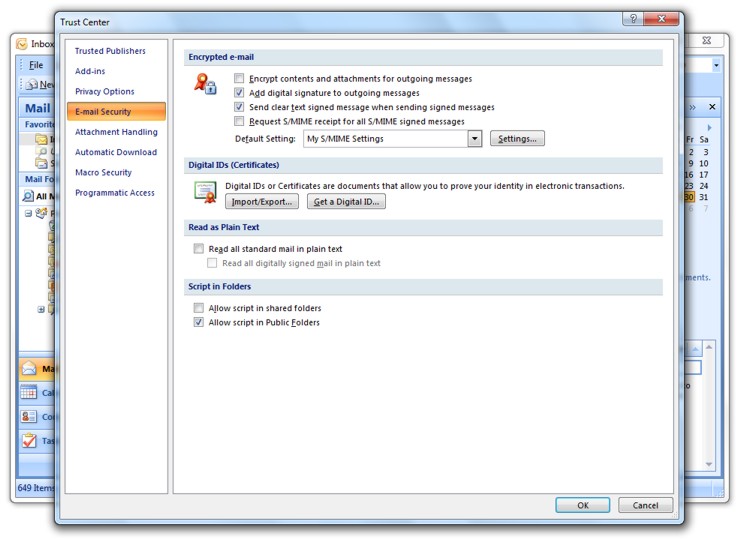
Next, we need to configure Outlook to use the certificate we just stored on the computer. Open Outlook and select the Trust Center from the Tools menu. Then, from the tabs on the left, select E-mail Security, and click on the Import/Export button.
 |
| The Outlook Trust Center |
Use the Browse button to find the certificate file you just saved on your computer, choose a Digital ID Name, and click OK.
Check the “Add digital signature to outgoing messages” box under Encrypted E-mail, and click OK. From now on, when you send digitally signed emails, you will be prompted for your PIN.
Encrypting Mail
Before your email correspondence with an individual can be encrypted, you must first send digitally signed messages to each other. If you have not already, go through the process explained above in Digitally Signing Email.
From the Outlook Trust Center, in the E-mail Security tab, check the “Encrypt contents and attachments for outgoing messages” box under Encrypted E-mail, and click OK. See the figure above.
Top