Using GoldKey in Windows
Contents:
– Creating a Primary Secure Drive
– Creating a GoldKey Secure Drive
– Modifying Secure Drives
– Locking Secure Drives
– Secure Drive Discovery
– Deleting Secure Drives
Creating a Primary Secure Drive
To begin using GoldKey encryption to secure your data, you will need to create a Secure Drive. If you have not already created a Primary Secure Drive, you may do so by clicking on the Create Primary Drive button in the GoldKey software.
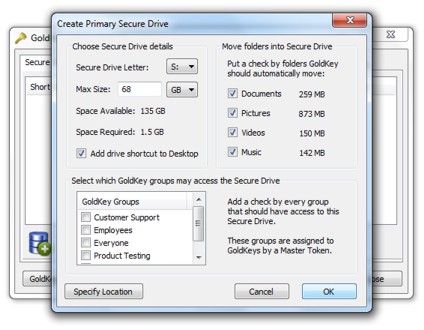 |
| Creating a Primary Secure Drive |
Be sure to make your Secure Drive large enough to hold the information you would like to encrypt. This drive cannot be resized later on. However, you may create more Secure Drives.
One feature of the Primary Secure Drive is that it supports Secure Folders. When you encrypt a folder using the Folder Encryption tab, or by checking a box beside a folder to move during creation, you encrypt your data by moving it into your Secure Drive, and placing a link to it in its original location.
Any folders you encrypt in these ways will only be accessible while the Primary Secure Drive is unlocked.
Once you have created your Primary Secure Drive, you are ready to start using GoldKey encryption to secure your data – simply move data into your Secure Drive.
Note: Using the Folder Encryption feature allows the encryption of data without having to reconfigure applications to look for their data in a new location.
The GoldKey application can be accessed at any time from the Start Menu, in the GoldKey folder under All Programs. There will also be an icon in the system tray showing a golden key. Clicking on this icon will open the GoldKey application.
To begin using GoldKey encryption to secure your data, you will need to create a Secure Drive. If you have not already created a Primary Secure Drive, you may do so by clicking on the Create Primary Drive button in the GoldKey software.
Top
Creating GoldKey Secure Drives
The typical way to create a Secure Drive is to click on the Create a Secure Drive button on the GoldKey toolbar. You will be shown the following dialog.
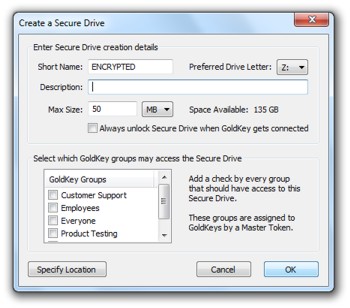 |
| Create a Secure Drive |
Secure Drive Creation Details
For each Secure Drive you create, you will be required to specify certain details. These include the short name, the preferred drive letter, and the size of the drive.
The short name assigned here will be the drive label that shows up in Windows Explorer.
The description is not required, but we recommend that you give descriptions for your Secure Drives. This will help you identify them later on, as the descriptions are displayed in the GoldKey software.
Note: If the preferred drive letter is in use when this drive is unlocked, a drive letter that is available will be automatically selected.
You may also specify a custom location for a Secure Drive. In this way, you can place Secure Drives on a different hard drive or a network file server.
Secure Drive Access
Up to thirty-two GoldKey groups may be given access to a particular Secure Drive at a time. In this way, you may have your data encrypted, but still allow multiple GoldKeys to access the data.
A Master assigns groups to GoldKeys. GoldKeys that have not been registered to a Master are members of a single group called “Everyone” by default.
Note: The Master that the GoldKey is registered to will be able to access encrypted data regardless of which groups are selected.
Top
Modifying Secure Drives
After a Secure Drive is created, certain settings may still be changed. These include the preferred drive letter, whether the volume should be unlocked at startup, the description, and group settings.
To change these settings, select the appropriate drive from the list shown in the Secure Drives tab, and click on the Drive Details button in the GoldKey toolbar.
Note: The description and group settings can only be modified while the Secure Drive is locked.
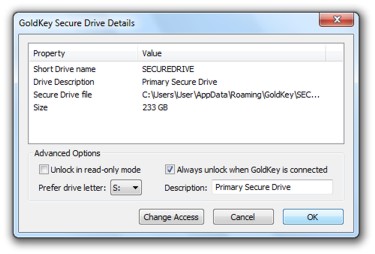 |
| Modifying a Secure Drive |
To change what groups can access this Secure Drive, click on the Change Access button. You will then see the list of groups you may allow to access this Secure Drive. You can grant access to as many as thirty-two groups.
To change which token owns a Secure Drive, plug in a GoldKey that can open the Secure Drive, and allow access to a group the new owner’s token is a member of. Save these changes and insert the new token, and then remove any unwanted groups.
Note: When you change a Secure Drive’s group settings, the GoldKey that is currently plugged in becomes the new owner of the Secure Drive.
When you are finished making changes, click the OK button.
To change a Secure Drive’s short name, unlock it and open Windows Explorer. Right-click on the drive and click on Properties. The drive label can then be changed at the top of the General tab.
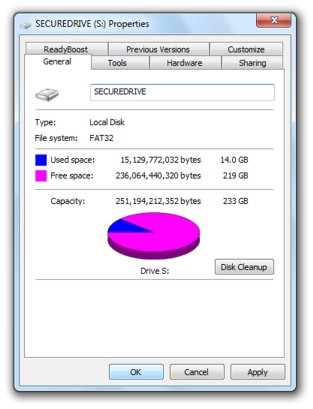 |
| Changing a Secure Drive’s Short Name |
Locking Secure Drives
To lock a Secure Drive, you may select it from the list in the GoldKey application, and click the Lock Drive button. Alternatively, you may right-click on the Secure Drive icon in the system tray (usually the right-hand side of the Start bar), and select the drive from the “Lock a Secure Drive” menu.
Top
Secure Drive Discovery
If you would like to search for Secure Drive files within a given directory, or even through an entire hard drive, you may use the Find Drives button in the GoldKey toolbar. You will be asked to specify which directory to search for Secure Drive files in. All subdirectories will be included in the search.
Top
Deleting Secure Drives
Before you delete a Secure Drive, unlock it and make sure you have copied out all of the data that you previously encrypted. All data within a Secure Drive will be lost when that drive is deleted.
To delete a Secure Drive, select the Secure Drive you want to delete from the list in the GoldKey application, and click on the Delete a Secure Drive button. Remember, all of the data within that drive will be lost.
Top