Using GoldKey in Mac OS X
Contents:
– Creating a GoldKey Secure Drive
– Modifying Secure Drives
– Locking Secure Drives
– Secure Drive Discovery
– Deleting Secure Drives
Creating GoldKey Secure Drives
When you unlock a Secure Drive, a removable drive icon appears on your Desktop and in Finder. When you copy data into this drive or save files here using an application, your data is secured using 256-bit AES encryption.
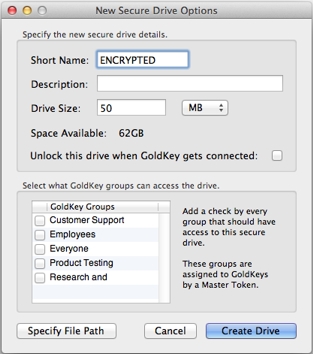
To create a Secure Drive, click on the Create Drive button in the Secure Drive List tab. You will see the dialog shown in the following figure. Follow the steps below to create a Secure Drive.
 |
| Create a Secure Drive |
Step 1 – Choose a Name
You will be required to specify a name for each Secure Drive, which should be unique. You will see this name as the label of the drive that appears when you unlock this drive. This name cannot be longer than eleven characters.
Step 2 – Give a Description
You may give a description to each Secure Drive you create. You will see this description in the list of Secure Drives. This is intended to help you identify the Secure Drive.
Step 3 – Specify a Size
You will need to specify a size for your Secure Drive. Secure Drives cannot be resized, so be sure to create them large enough to hold all the data you would like them to contain.
Step 4 – Configure Options
Next, you may specify the different drive options. You may choose to have this drive unlock automatically whenever your GoldKey is connected, and you may specify a custom location for the encrypted file. Please see the Encrypted Files section for more information.
Step 5 – Set Group Privileges
Finally, you may allow up to thirty-two groups to access any particular drive. To allow access for a group, check the box beside the name of that group in the list shown in the figure above.
Note: The Master that the GoldKey is registered to (if any) will be able to access encrypted data regardless of the group settings.
Top
Modifying Secure Drives
After a Secure Drive is created, you can only change certain settings. These include whether the drive should be unlocked automatically whenever a GoldKey is connected, whether to unlock the drive for read-only access, the description, and group access settings.
To change these settings, select the appropriate drive from the list shown in the Secure Drive List tab, and click on the View Details button.
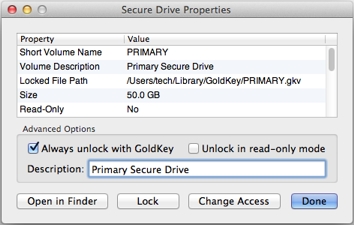 |
| Modifying a Secure Drive |
To change this drive’s access permissions, click on the Change Access button. You will then see the list of groups you may allow to access this Secure Drive. You can grant access to as many as thirty-two groups.
When you are finished making changes to this Secure Drive, click the Done button.
Top
Locking Secure Drives
You may lock a Secure Drive simply by using any of the Mac “eject” techniques (dragging the unlocked drive over the Trash, etc).
You may also lock Secure Drives from the Secure Drive List in the GoldKey application by clicking on the Lock All button, or by selecting the drive you would like to lock from the list provided and clicking on Lock.
Top
Secure Drive Discovery
Note: We suggest that you read the Encrypted Files section in the GoldKey Manual before attempting to use this feature.
The GoldKey software can look in several places for Secure Drives to unlock. By default, it only searches the user’s Library/GoldKey directory. New directories can be searched using the Find Drives button in the Secure Drive List. This will open a dialog where you may select which folder you would like to search for Secure Drive files. Any subdirectories will be searched recursively.
Top
Deleting Secure Drives
Before you delete a Secure Drive, unlock it and make sure you have copied out all of the data that you previously encrypted. All data within a Secure Drive will be lost when that drive is deleted.
To delete a Secure Drive, open the Secure Drive List in the GoldKey software, select the Secure Drive you would like to delete, and click on the Delete button. Remember, all of the data within that drive will be lost.
Top